Our Zund G3 digital router can do some amazing things. It is able to cut through a variety of materials, from BioBoard to even leather. Of course, the best results are achieved when the print and cut files are set up correctly. It does take a little knowledge of Illustrator to do it right. This step by step guide shows the best way to set up a file for printing and cutting.
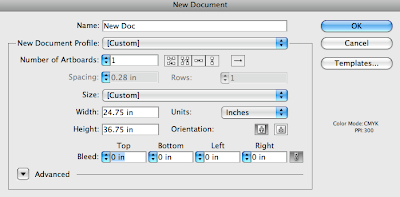
First create a new document in Illustrator. Make sure the document size is large enough to fit the graphic plus registration marks outside of the image. (Registration marks are required for the camera guide on the digital router to line up the artwork and cut file properly.)
Next create three layers in the new document. One for the RegMarks (Registration Marks), one for the ThroughCut (or KissCut if that is what is called for in the project), and one for the graphic or Artwork. Each layer should be named appropriately.
Place your graphic in the Artwork layer. Make sure the artwork is inside the document's
bounding box.
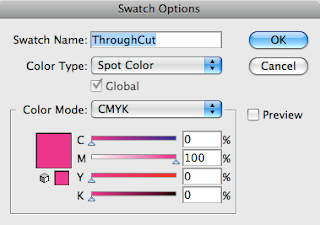
On your cut layer create lines and shapes that will go around the artwork. Be sure that proper bleed is built in your graphic and the cut lines are inset at least 1/4" from the outside of your artwork. Create a new swatch named ThroughCut set to Spot Color CMYK and 100% magenta. We recommend making the fill or stroke of the line .5 pt in thickness.
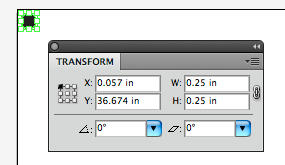
For the Registration
Marks layer create .25" black circles. Place reg marks outside the graphic, but inside the bounding box of the document.
Be sure to check for any stray points or lines in the file that would effect your final cut.
When you are ready to save, save two versions of the file. To create the print file, turn off the Cut Path layer and leave the Artwork and Registration Marks layers turned on. Save this file as a pdf or eps. To create the cut file, turn off the Artwork layer and make sure the Registration Marks and Cut Path layers are turned on. Save this file as a native Illustrator ai file.
Master these steps, and you will be able to add custom cut elements to your design projects.


 We also worked with Scott to create an oval shaped image for a unique presentation. The image was printed direct on to Sintra and cut to shape with our digital router. The oval outline shape on the group of cyclists training together gives the image motion, and a truly thinking outside the box presentation. The ability to create and deliver images of different sizes, shapes and materials gives Innerhand Shaping the professional tools to deliver on artistic vision.


 Posts
Posts

